This week we have several new design and manufacturing updates. On the design side, we started to look more closely at the feedback we received at our last presentation and to finalize our plan for the solution that will allow us to take the photo(s) that we will make in and out of the polaroid. On the manufacturing side, we created our mold for the body part and the corresponding CAM.
Design Updates
 At our last class, we were still trying to decide how we wanted to incorporate the polaroid picture piece that would come out of our yoyo. We initially thought of doing some kind of spring-loaded application (similar to an SD card reader), but this past week we settled on the idea of doing magnets.
One of the magnets will be on the "photo" (which we decided to injection mold instead of thermoform) and the other one will be press fit into the front of the yoyo next to the "camera's lens" (shown below). We are still trying to figure out which kind of magnets we will use based on the strength of the magnets (they will have to be relatively strong because they will be separated by an air and plastic-filled gap) and the size of them. Some good sources of magnets that are about the correct size are the magnets used on the littleBits and on the magnetic reading glasses, known as Click Its.
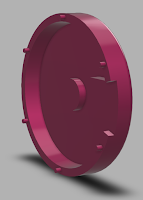 We also looked at the issues we had with our mold and the feasibility of designing it the way we intended. We decided that it would be easier for the lens to shift entirely down to the bottom piece because it would created fewer odd shapes in our mold without seriously affecting our design aesthetics. As you can see in the picture above, the lens is now entirely sitting on the bottom half of the camera. In addition, we shelled our two snap pieces, reduced the number of pegs from 10 to 6, shortened and fattened the extruded area around the lens, and removed the additional ledge on the body part that was inherited from the LMP yoyo (originally to guide the snap ring).


 The Core
On the core side, we start by drilling out the holes where the ejector pins will be. Again we start with center drilling using tool 15 before doing the deep drilling with tool 16. Then, we drill the holes for our pegs, which are not through holes using tools 15 and 2. Next, we do adaptive drilling with tools 12 and 1 to form the yoyo piece and to make the slot. And we finish up with contouring and putting in the middle pocket using tools 2, 14, and 6.


Design Updates
 At our last class, we were still trying to decide how we wanted to incorporate the polaroid picture piece that would come out of our yoyo. We initially thought of doing some kind of spring-loaded application (similar to an SD card reader), but this past week we settled on the idea of doing magnets.
One of the magnets will be on the "photo" (which we decided to injection mold instead of thermoform) and the other one will be press fit into the front of the yoyo next to the "camera's lens" (shown below). We are still trying to figure out which kind of magnets we will use based on the strength of the magnets (they will have to be relatively strong because they will be separated by an air and plastic-filled gap) and the size of them. Some good sources of magnets that are about the correct size are the magnets used on the littleBits and on the magnetic reading glasses, known as Click Its.
 We also looked at the issues we had with our mold and the feasibility of designing it the way we intended. We decided that it would be easier for the lens to shift entirely down to the bottom piece because it would created fewer odd shapes in our mold without seriously affecting our design aesthetics. As you can see in the picture above, the lens is now entirely sitting on the bottom half of the camera. In addition, we shelled our two snap pieces, reduced the number of pegs from 10 to 6, shortened and fattened the extruded area around the lens, and removed the additional ledge on the body part that was inherited from the LMP yoyo (originally to guide the snap ring).
Manufacturing (Mold) Updates
We also created our molds and the accompanying CAM. We used the sprue and ejector pin files that we were provided to map out the holes that we need in the core and cavity pieces. When we go to machine, we will start by drilling the center holes on the core and the cavity.
The Cavity
First, we will center drill the center hole in the cavity piece (tool #15), and then we will drill through the rest of the material (tool #17). Then we will face the whole surface using tool #18 and use an adaptive tool path to do the inside area where the body will be (tool # 12). Afterwards, we finish the cavity by scalloping the inside of the body area around the edges (using tool #12) and completing a 2D contour with tool #10.

The Adaptive Tool Path for the Inside Section with the Body

The overall picture of the cavity.
On the core side, we start by drilling out the holes where the ejector pins will be. Again we start with center drilling using tool 15 before doing the deep drilling with tool 16. Then, we drill the holes for our pegs, which are not through holes using tools 15 and 2. Next, we do adaptive drilling with tools 12 and 1 to form the yoyo piece and to make the slot. And we finish up with contouring and putting in the middle pocket using tools 2, 14, and 6.

Creating the pocket at the end

Adaptive tool path to create the slot for the photo

Adaptive tool path for the top face

Final Core
We are excited to start machining our molds!
Comments
Post a Comment